Saturday, October 18, 2014

Soft Kitty, Warm Kitty, Little Ball of Furrr...

If you watch the Big Bang Theory, chances are you know how catchy the soft kitty song is. Every time Penny sings it to Sheldon I find myself singing or humming it for the rest of the night. 


Anyway, today that song was stuck in my head ALL DAY because we found a kitten!


My sister, mother, and I were coming home from lunch when I saw a little black fur ball sitting in the middle of the road. Since our farm isn't in a residential area, the speed limit on the road is pretty high, 40 at least. As I slowed down, it ran off into the brush that lined the sides of the road. We could see that it was still sitting there, so I pulled onto the shoulder and my mom got out to see if she could catch it. After 15 minutes of crawling through brush, over logs, and into ditches, we were soaked and no closer to catching the kitten. 

We decided to head back to the house and return with a Havahart trap. 30 minutes, 4 people, and a high speed golf cart ride later, we were bringing the kitten back to the farm. 
We unloaded the kitten into a large dog crate and were surprised to find that he would let us hold him in a towel. My dad immediately bonded with him as did everyone else in the family. Knowing he was a keeper, we decided to name him Lucky. 


He's a little cutie and I hope living with us will make him fat and happy. 
Until next time!


Friday, October 17, 2014

Equestrian Wishlist and Some Cute Horse Pictures

Weddings are expensive. There are a few equestrian things I've had my eye on for a while, but in reality won't be able to purchase until after my wedding/when I have a real job.

Tailored Sportsman has a ton of great colored breeches for schooling and I'm loving the fern green in the Trophy Hunter Front Zip. The fern green in person is actually a really nice shade of not-too-green green and less khaki than the picture shows. They can be found at SmartPak and other retailers starting at $179.95.


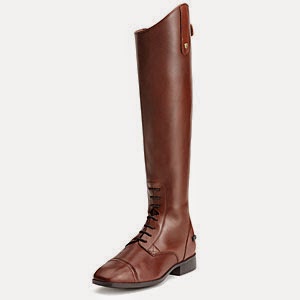
Another item that's slowly grown into one of my new obsessions is brown leather tall boots.


These are Ariat® Challenge Contour Square Toe Field Boot in cognac and can be found at SmartPak for $399.95. They have a full length elasticized panel on lateral side with elastic gusset on inside knee as well as a contoured ankle. With a fashionable sqaure toe, these are boots I'd love to have for schooling, especially now that fall is upon us.

I bought a Samshield Shadowmatt helmet two years ago on national helmet awareness day and I love it. Samshield also makes custom helmets with a ton of different options. Sticking with the brown theme, I customized a helmet, complete with name personalization on the chin strap. Totaling $2668 it is WAY out of my comfort zone to spend on a helmet, but with crocodile accents, a girl can dream.


Click here to customize your own on the mySamshield page

Going on with the custom theme, Equifit makes custom D-Teq open front and ankle boots. With fun leather patterns and a choice of colors, these boots sell for only a slightly higher price point than the Equitfit LUX boots that I already have. Do I really need a pair of new boots for a horse that I don't have? Nope, but I spent close to fifteen minutes designing a new pair.

The last item im going to talk about is one that I'm REALLY excited about purchasing once I find a horse. It's a custom monogrammed bridle. The first time I saw one was before I was even in high school, but the thought of owning one has stuck with me since. Bennett's Hunter (TM) offers monograms on their bridles at only $15 per letter, but that does not include the price of the bridle and reins. A little bit of a splurge, but properly cared for leather can last a lifetime.

Thanks for reading!

Be sure to follow me on instagram @rocky092 for more equestrian and horseback riding posts


Ocho


Galant


Ronnie


Tiger


Nick


Luther


Friday, October 10, 2014

Past Sugar Cookie Projects

Before heading to Atlantic City for a conference this weekend, I thought I'd do a quick post on previous sugar cookies I have made. My sugar cookie obsession started after stumbling upon the Sweet Adventures of Sugarbelle, the cookies are out of this world amazing. The blog features step by step instructions with photos, recipes, tips, and a whole bunch of extras.

My first attempt at making intense sugar cookies was for Thanksgiving last year. I just followed the step by step instructions for Sugarbelle's decorated turkey and pumpkin cookies and here's how they turned out. 


Pretty good for my first time, eh?! They took me about a day and a half to make, but that included the baking of the cookies and drying time in between icing colors.

The next set I made was for Christmas of last year and I followed this reindeer tutorial, which was actually a guest post, leaving out a few of the more ornate finishing details. I also added a few cookies of my own design including customized Santa hats and snow topped candy canes.  


Santa hat cookies

                                                                                                     
The last set of cookies I'm going to sugar with you are ones that I made at the end of my low vision rotation in optometry school. They were mini retina cookies with various ocular diseases. 

retinal disease cookies


These were ones I designed completely by myself and I was really happy with how they came out.

That's all for now, hope you enjoyed!

Be sure to follow me on instagram @rocky092 to se more food and cookie posts


Wednesday, October 8, 2014

Pumpkin Spice Challah Bread


I wasn't joking when I said that I was obsessed with pumpkin spice everything in the fall. In the last week and a half I've used 3 cans of pumpkin purée. And it's only October.

On the drive home I had a craving for challah bread. Knowing I had some leftover pumpkin purée, I wondered if I could make pumpkin spice challah bread. I got home and immediately looked up a recipe, and set out to experiment with my first batch ever. 

Pumpkin Spice Challah Bread
1 1/2 teaspoons active dry yeast
1 1/4 cups warm water (110 F if you have a thermometer handy)
1/4 cup honey
2 tablespoons canola oil
2 eggs, one for dough, one for egg wash
1 1/2 teaspoon salt
1/3 cup pumpkin purée
1 tablespoon cinnamon 
2 teaspoons ground nutmeg
1 teaspoons ground ginger
6 cups all purpose white flour 

Yields 2 loaves of challah bread

1. Place warm water in bowl of stand mixer. Sprinkle active dry yeast over top and set to the side.  In a small measuring cup, measure out honey and add pumpkin, oil, one egg, salt, and spices. Combine well. 

2. Add contents of mixing cup to water/yeast mixture and attach to a stand mixer fitted with a dough hook. Turn speed to stir and slowly begin adding the flour. Add a single cup at a time waiting until most of the flour has been incorporated before adding the next cup. 

3. Once all the flour has been added, mix for an additional 8 minutes or until the dough clumps around the hook. The dough should no longer be sticky to the touch and should spring back after it's touching it. (If the dough is too sticky, gradually add small amount of flour until the right consistency is reached, 1/4 cup at a time). 


4. Remove dough from mixer bowl, shape into a ball, and place in a glass bowl to rise. Cover bowl with a damp cloth and find a warm spot in your kitchen to let the dough rise for 1.5 hours or until doubled in size. 


Here the dough has almost risen enough, only a little bit more to go
5. After the dough has doubled in size, divide in half and knead for 5 minutes on a floured surface. Divide the dough half into thirds and using a rolling/stretching motion, roll out into logs approximately 1.5 inches in diameter. Firmly pinch ends of logs together. Braid the three strands of dough, firmly pinching the end of the braid to secure. Repeat for the second half of dough.


6. Place each half on a greased baking tray and cover with the damp cloth. Allow the braided dough to rest for another hour.

While the dough was resting I munched on, you guessed it, pumpkin seed brittle! I bought it at Trader Joes and it's a nice blend of pumpkin pie spices and pumpkin seeds.


 7. During the last 10 minutes of the dough resting, preheat oven to 375 F. Beat 1 egg with one tablespoon of water to make egg wash. Liberally brush each loaf with wash. Bake loaves for 40 minutes until golden brown and bottoms sound hollow when tapped. Cool on a wire rack for 1 hour before slicing. 


Super tasty with spread with a little of Trader Joe's pumpkin butter. Awesome and well worth the wait!

Hope you enjoyed!

Be sure to follow me on instagram @rocky092 for more recipes and food posts


Tuesday, October 7, 2014

Past Macaron Projects

I've had a cold for the last week, and coupled with a busy weekend doing wedding things, I didn't have time to do a full post. Here's some pictures of past french macarons I have made to hold you over until I have time to do a tutorial on them.


The abominable snow cookie- coconut macaron


Sample of macaron gift packaging of an order


Cacao nib macaron with chocolate ganache filling


Chocolate macaron with coconut buttercream filling


Fluffernutter macaron-
Cinnamon shell with a peanut butter buttercream topped with marshmallow filling


French toast macaron with maple buttercream filling


Package of lavender honey and french toast macarons


S'more macaron-
Chocolate shell topped with mini marshmallows with chocolate ganache and marshmallow filling


Another shot of the s'mores


Strawberry macaron with vanilla bean buttercream filling


Matcha (green tea) macaron


Espresso macaron


Blueberry cheesecake macaron


You can find my vanilla macaron tutorial here, let me know if you have any questions. Enjoy!

Be sure to follow me on instagram @rocky092 for more food and baking posts

Wednesday, October 1, 2014

Homemade Pumpkin Ravioli with Pumpkin Cream Sauce

I should have been a housewife

Fall is my favorite time of year and one of my favorite things about fall is pumpkin spice everything. Today I finally decided to try making pasta from scratch, more specifically, pumpkin ravioli from scratch. I couldn't find the exact combination of ravioli and sauce I had in mind, so I mixed and matched a couple of recipes to get just what I was looking for.

Pumpkin Spice Ravioli with Pumpkin Cream Sauce

For the Pasta:
2 cups all purpose flour
1 teaspoon salt
3 eggs, and one more for egg wash
1 tablespoon olive oil
Cornmeal

For the Filling:
7.5 oz  pumpkin pie filling (1/2 can)
1 teaspoon pumpkin pie spice
2 tablespoon paremesean cheese
Salt and pepper

For the Sauce:
1 cup heavy cream
1/2 can pumpkin pie filling
1/4 cup parmesan cheese
Salt and pepper
1 tablespoon butter

1. In a mixer fitted with a dough hook combine flour and salt. Turn mixer on low and add eggs one by one waiting until each egg has been incorporated before adding the next. Slowly drizzle in olive oil and mix a few minutes more until dough clumps around dough hook. 

I should have been a housewife

2. Remove dough from bowl and knead on a floured surface for 10 minutes. 

I should have been a housewife

(Above: before kneading, Below: after kneading)

I should have been a housewife


3. Drizzle dough with olive oil and wrap loosely in plastic wrap. Let dough rest for 30 minutes. While the dough is resting combine the 7.5 oz of pumpkin pie filling, pumpkin pie spice, parmesan, and salt and pepper to taste. Mix well and set to the side. 

4. For the sauce combine the cream and pumpkin pie filling in a pot over medium heat and stir well. Once simmering, add Parmesan cheese, and salt and pepper to taste. Cook for 7 minutes until slightly thickened, remove from the heat. 

5. When the dough has finished resting, divide in half and re-cover portion not being immediately used. On a floured surface, pull dough into a log and flour top surface. With a rolling pin, flatten into a long rectangle and roll out as thin as possible (to 1/16 of an inch or the height of two stacked quarters).

I should have been a housewife


I used a the thinnest set of rolling pin guides from a pack I had purchased for making sugar cookies. 


I should have been a housewife

     I used the red guides shown above


6. Lightly press the larger end of a shot glass along the lower edge of the dough leaving 1-2 inches between pressings.  This acts as a guide for filling and ensures even spacing of ravioli. 
I should have been a housewife


7. Brush egg wash over the lower half of the rolled out dough where the guides are spaced. Place a heaping teaspoonful of filling into the center of each guide.

I should have been a housewife


8. Gently fold top half of dough over the teaspoons of filling. Starting from the top of each filling mound, lightly press air out from between filling and dough. Firmly Press dough together at the base of the filling to secure ravioli. Repeat for each mound of filling. With a sharp knife, trim excess edge leaving a 1/4 inch skirt around the mound of filling. 

I should have been a housewife


I should have been a housewife


9. Spread a thin layer of cornmeal into a baking sheet. Transfer ravioli from floured surface onto baking sheet. Dip the tines of a fork into flour and press tines along edge of ravioli to firmly seal. 

I should have been a housewife


10. Bring a wide pot of water to a boil. Repeat steps 8-13 for the second half of dough. Once water is boiling, add ravioli to water making sure not to over crowd the pot (you may have to cook in multiple batches to prevent ravioli from sticking). Cook for 4-5 minutes stirring once gently. While ravioli are cooking, reheat sauce, bringing to a simmer. Remove from heat and finish with one tablespoon of butter. 

11. Once ravioli are finished cooking, remove gently with a slotted spoon. Plate ravioli and top with pumpkin cream sauce and extra Parmesan cheese. 


I should have been a housewife


This was a perfect pumpkin kick to my tastesbuds after a busy day at work. 


Hope you enjoyed!!

Be sure to check out more of my food love on instagram @rocky092