Showing posts with label ishouldhavebeenahousewife. Show all posts

Sunday, April 5, 2015

Happy Easter and Some Bunny Themed Sugar Cookies

I should have been a housewife

Spring is finally here and my Easter wouldn't be complete without some sugar cookies.

I love all of the designs from Cookies with Character but when I saw the Peek-a-Boo Bunnies, my heart flip flopped. An animator by trade, her designs are adorable and original and I could spend hours looking through her blog.

I also drew my inspiration for my Easter bunny cookies from the Sweet Adventures of Sugar Belle. If you haven't been to her site before she has a ton of information on cookies and cookie decorating.

The recipes for sugar cookies and royal icing are both from Sugar Belle's and can be found here and here.

Enjoy!

I should have been a housewife

I should have been a housewife

I should have been a housewife

I should have been a housewife

I should have been a housewife

I should have been a housewife

I should have been a housewife

I should have been a housewife

Thursday, March 19, 2015

Engagement Photo Shoot and a Red Dress from Rent the Runway

I should have been a housewife

Nick and I had our engagement shoot last weekend and I couldn't be happier with how the pictures came out. Our photographer was great and super accommodating (we had to change days and adjust around our work schedules due to the weather) and the castle we did our shoot at was the perfect location.

I decided to rent a red dress from Rent the Runway because 1. I wanted to offset the drab colors of a New Jersey winter and 2. I'm still partially living out of suitcases and can't find half of my clothes anyway. The dress retails for $425 but for around $50 I was able to rent it and it was shipped right to my door. I actually signed up for a year membership which only costs about $5 more than paying for the insurance and shipping separately, so I was one happy camper. I plan on doing the same thing for my shower, bachelorette party, and rehearsal dinner that way I don't have to shell out a ton of cash on dresses I might only be able to wear a couple of times. You can find out more about them and browse dresses on their website.

But enough of that, here are just a few of the photographs from our session.

I should have been a housewife

I should have been a housewife

I should have been a housewife

I should have been a housewife

I should have been a housewife

I should have been a housewife

I should have been a housewife

I should have been a housewife

I should have been a housewife

 Many thanks to John Agnello Photography for our amazing pictures.

Be sure to follow me on instagram @rocky092 for more engagement, shower, and wedding photos


Monday, January 26, 2015

Red Velvet Valentines Pancakes

I should have been a housewife

I was in the mood for something sweet over the weekend, and with it being close to Valentine's Day, my pinterest was flooded with red velvet everything. I looovee fresh pancakes on the weekends so making red velvet pancakes seemed like a no brainer. Here's the recipe I used (although I ran out of food coloring, so they weren't as red as I would have liked them)

Red Velvet Pancakes
2 cups all purpose flour
2 tbsp baking powder
1 teaspoon salt
2 tbsp sugar

2 tbsp unsweetened cocoa powder
2 egg, beaten
1 1/2 cups buttermilk
4 tablespoon butter, melted
2 tbsp red food coloring

Optional:
Cream Cheese Glaze
4 oz cream cheese, softened
1.5 cup powdered sugar
3-4 tablespoons milk
1 teaspoon vanilla extract
powdered sugar for garnish

1. Combine all the dry ingredients in a medium bowl and mix well. Add wet ingredients and mix until just combined.

2. Preheat a large fry pan over low-medium heat. Drop 1/2 cup portions of batter onto the fry pan and cook until bubbles rise to the top of the cooking pancake. Flip and cooked until pancakes have risen slightly and are cooked through.
3. Garnish with glaze/whipped cream/ powdered sugar and serve.

Enjoy!

I Should Haven Been A Housewife

I Should Haven Been A Housewife

Sunday, December 21, 2014

Easy Peppermint Christmas Coal Cookies

I should have been a housewife

This fun Christmas treat is perfect for anyone, regardless if they're on the naughty or nice list. I've seen the recipe floating around on Pinterest for years but thought I'd give it a try this Christmas.


Christmas Coal
1 16 oz package of chocolate sandwich cookies
5 cups mini marshmallows
4 tbsp butter
1/2 tsp vanilla or peppermint extract

  1. Pulse sandwich cookies in food processor until finely ground.
  2. In a medium bowl combine marshmallows, butter, extract, and ground cookies
  3. Heat in microwave for 1 minute then mix until well combined.
  4. Drop small clumps (careful, it may still be hot) onto parchment paper and allow to cool.

Enjoy!


Saturday, December 20, 2014

Mickey Gingerbread Cookies


I can't even remember the last time I made gingerbread cookies, it was easily over 10 years ago. For some reason this year I was craving them and when I saw this adorable Mickey Mouse cookie cutter  I knew I had to buy it and make some. I usually don't spend more than a couple bucks on cookie cutters, but for this one I made an exception.


This fun Christmas treat is perfect for anyone, regardless if they're on the naughty or nice list. I've seen the recipe floating around on Pinterest for years but thought I'd give it a try this Christmas.


Gingerbread Recipe
1 cup butter
1 cup granulated sugar
1 1/4 cup molasses
2 eggs
1 tsp vanilla extract
6 cups all-purpose flour, plus more for rolling
1 tsp baking soda
1 tsp salt
2 tsp ground ginger
3 tsp ground cinnamon
1 ½ tsp ground cloves
2 tsp ground nutmeg
  1. Cream butter and sugar in a medium bowl. Add molasses, eggs, and vanilla extract. 
  2. Mix together dry ingredients with a whisk in a medium bowl. Add one cup of mixed dry ingredients to the wet ingredients, incorporating each addition before adding the next.
  3. Divide dough into three portions and wrap in plastic wrap. Refrigerate for 1 hour. While dough is chilling preheat oven to 375 F.
  4. Spread flour onto your working surface and roll dough to approximately 1/4" (Rolling pin guides are AMAZING. They take all of the guesswork out of rolling out dough and come in a few different sizes. You can find them here).
  5. Cut out cookies and place on parchment lined baking sheets. Baking time is 10 minutes for a 4" cookie, 2 minutes less or more for a smaller or larger cookie respectively. Be careful not to burn the cookies since its hard to tell if they're browning or not. Start with 8 minutes for a medium 4" cookie then increase the baking time if needed.
  6. Let cool and then decorate! I decided to dip the ears in chocolate to make them look like they were wearing little mouse ear hats, plus it only took a couple of minutes extra.
Enjoy!

Monday, December 15, 2014

My Favorite Shrimp Ceviche

I should have been a housewife


I love going into specialty olive oil/vinegar stores and trying all the different styles and flavors they have. One of the first times I went I found coconut flavored white balsamic and was in heaven. I bought it and thought I'd use it on salads (which I still haven't done), but found a much better use for it; My favorite shrimp ceviche.

Ceviches are seafood dishes where acidic juices (such as lemon, lime, and orange) are used to "cook" the fish. Here's my go to recipe for shrimp ceviche.

Shrimp Ceviche

1 lb raw shrimp, peeled and deveined and cut into bit size pieces
6 limes, juiced (approx 2/3 cup)
2 lemons, juice (approx 1/3 cup)
2 tablespoons orange juice
1 cup cucumber, peeled and 1/4" cubed, seeds removed (approx. 1 medium)
1/2 cup finely chopped red onion (approx 1/2 medium)
1 jalapeno pepper, finely chopped1 avocado 1/2" cubed
1 tablespoon chopped cilantro, plus more for garnish
1/4 cup olive oil
1/4 teaspoon salt
2 tsp coconut balsamic vinegar
Tortilla chips


1. Cut raw shrimp into bite size pieces and place in non metallic bowl. Add lime, lemon, and orange juice to cover and refrigerate for 1/2 hour. Mix occasionally until shrimp are pink and look cooked through.

I should have been a housewife

Here the shrimp have turned pink and are no longer transparent

2. Add remaining ingredients and stir well. Can be kept in the refrigerator for 4 hours. Let sit at room temperature for a half hour before serving.

Enjoy!

Sunday, December 14, 2014

Sue's Mandelbread Cookies

I should have been a housewife

In preparation for the holidays, kitchen Kaplan was in full swing this Sunday morning. We made chocolate covered pretzels, gingerbread men, forgotten kisses, and my personal favorite, mandelbread cookies.

Mandelbread is a traditional Jewish cookie that is similar to a biscotti, but with this recipe they almost melt away in your mouth while maintaining a satisfying crunch. We used chocolate and butterscotch chips but I'm really excited to try the recipe with dried cranberries and pistachios as well. Here's the recipe we made this morning.

Sue's Mandelbread Cookies
3 cups flour
1 tsp salt
2 tsp baking powder
3 eggs
1 cup sugar
1 cup oil
7 oz chocolate chips
5 oz butterscotch chips
3 tbsp cinnamon and 3 tbsp sugar combined for dusting

1. Preheat oven to 375 F and line a large baking sheet with parchment paper. Mix together dry ingredients in a large bowl then add wet ingredients until well combined. Mix in chocolate and butterscotch chips.

2. Divide mixture into 3 loaves onto parchment lined baking sheet and sprinkle each with cinnamon sugar. Bake for 20 minutes until lightly golden brown.

I should have been a housewife

3. Cool for 15 minutes then slice into  3/4" pieces across the short side. Arrange cookies cut side up on the baking sheet and bake for an additional 15 minutes.

I should have been a housewife


Enjoy!

Be sure to follow me on instagram @rocky092 for more baking and cookie posts


Tuesday, October 21, 2014

Mary Beth's Apple Cobbler


This weekend we went to a local apple festival near the farm. In addition to selling apples they have various baked goods, home cooked Polish food (pierogi and haluski), candy, and my personal favorite, chocolate covered caramel apples. We also picked up two bottles of Razz's hickory syrup which tastes amazing on anything from grilled peaches to sausage and squash. Hickory syrup is similar to maple syrup but with a smokier, woodsier taste. I've never seen hickory syrup anywhere other than from this vendor, at this festival, and we finished ours up so quickly last year I knew I had to grab more. The website also has a ton of recipes you can find here.

After spending the day eating all the different treats the festival had to offer, we picked out a bag of Honeycrisp apples, which are my favorite (not including ones covered in chocolate and caramel), and headed home to bake some more treats.

Since Honeycrisp apples are too good to eat any other way than fresh, we used apples that we picked from my cousins orchard the day before. They have a few trees filled with apples and pears that are great for baking as well as eating fresh. Since everyone I know loves apple cobbler, that's what we decided to bake. A recipe using the pears will be posted later this week.

I was lucky and had my cousins as baking assistants,
they peeled almost all the pears and apples for me!


Mary Beth's Apple Cobbler
This recipe is from my future mother in law, I just add a little bit of nutmeg since I love it and some oatmeal for extra texture.

7 large apples
1 1/4 cups flour
1/4 cup instant oatmeal
1/2 cup sugar
3/4 cup packed brown sugar
1 teaspoon cinnamon
1/4 teaspoon ground nutmeg
1 1/2 sticks of cold butter, cubed

1. Preheat oven to 400 F. Peel and slice apples into bite size chunks and place into a buttered rectangular baking pan. (I doubled the recipe when I made it, so I used two baking pans)

2. In a separate bowl mix together the dry ingredients until well combined. With a pastry blender (or a large fork if you don't have one handy) combine the cubed butter with the dry ingredients until only small pieces of butter remain. Spread mixture thickly on top of the apples.


3. Bake cobbler for 45 minutes or until apples are soft and cobbler topping is golden brown and crunchy.


I served mine with homemade ice cream, either pumpkin spice, vanilla bean, or both. The cobbler is amazing right out of the oven, the heat from the cobbler starts thawing the ice cream and makes things all melty and wonderful.


Hope you enjoyed, let me know if you have any questions!


Friday, October 17, 2014

Equestrian Wishlist and Some Cute Horse Pictures

Weddings are expensive. There are a few equestrian things I've had my eye on for a while, but in reality won't be able to purchase until after my wedding/when I have a real job.

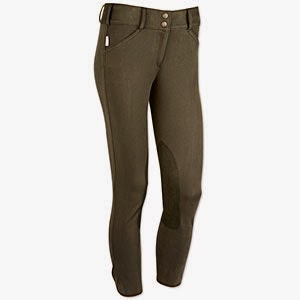
Tailored Sportsman has a ton of great colored breeches for schooling and I'm loving the fern green in the Trophy Hunter Front Zip. The fern green in person is actually a really nice shade of not-too-green green and less khaki than the picture shows. They can be found at SmartPak and other retailers starting at $179.95.


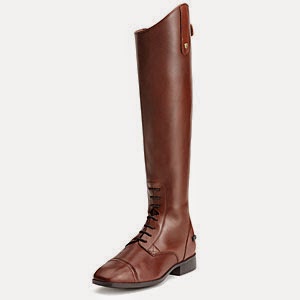
Another item that's slowly grown into one of my new obsessions is brown leather tall boots.


These are Ariat® Challenge Contour Square Toe Field Boot in cognac and can be found at SmartPak for $399.95. They have a full length elasticized panel on lateral side with elastic gusset on inside knee as well as a contoured ankle. With a fashionable sqaure toe, these are boots I'd love to have for schooling, especially now that fall is upon us.

I bought a Samshield Shadowmatt helmet two years ago on national helmet awareness day and I love it. Samshield also makes custom helmets with a ton of different options. Sticking with the brown theme, I customized a helmet, complete with name personalization on the chin strap. Totaling $2668 it is WAY out of my comfort zone to spend on a helmet, but with crocodile accents, a girl can dream.


Click here to customize your own on the mySamshield page

Going on with the custom theme, Equifit makes custom D-Teq open front and ankle boots. With fun leather patterns and a choice of colors, these boots sell for only a slightly higher price point than the Equitfit LUX boots that I already have. Do I really need a pair of new boots for a horse that I don't have? Nope, but I spent close to fifteen minutes designing a new pair.

The last item im going to talk about is one that I'm REALLY excited about purchasing once I find a horse. It's a custom monogrammed bridle. The first time I saw one was before I was even in high school, but the thought of owning one has stuck with me since. Bennett's Hunter (TM) offers monograms on their bridles at only $15 per letter, but that does not include the price of the bridle and reins. A little bit of a splurge, but properly cared for leather can last a lifetime.

Thanks for reading!

Be sure to follow me on instagram @rocky092 for more equestrian and horseback riding posts


Ocho


Galant


Ronnie


Tiger


Nick


Luther