Sunday, December 6, 2015

Equestrian Holiday Gifts and Stocking Stuffers


1. Personally Preppy monograms
I should have been a housewife
Example of the black gloss helmet monogram from the Personally Preppy website

They make vinyl monograms and heat transfers for just about anything and everything you can think of. From head (helmets) to toe (boots) they have tons of styles, colors, and sizes to choose from. In addition to monograms they also sell jewelry, accessories, and home goods. I'll be stocking up on the heat transfers for my breeches ($5.99 for 1" glitter monogram), a vinyl monogram for my helmet ($8.25 for 2" black glossy), and monograms for my horse boots ($12 for a 1" pair) just to get started. They also sell a Personally Preppy baseball hat that is adorable (on sale for $16). You can fill up on stocking stuffers through their website or order a gift card and let your giftee pick the monograms out themselves.


2. C4 Belts- $30-$34
I should have been a housewife
My newest C4 belt color combo, mint and gold chrome

I am seriously addicted to C4 belts; I have 5 classic belts and just ordered my first skinny belt. You purchase the rubberized belt and buckle separately so you can mix and match allowing for hundreds of color possibilities. C4 also donates 10% of each purchase to selected charities on their website. The thing I love most is that the buckles are interchangeable within their styles so I can swap out any buckle and place it on the same size belt of a different color, almost doubling my belt inventory.  My classic stock includes hot pink/hot pink, lavender/lavender, grey belt/silver chrome buckle, orange belt/turquoise buckle, mint belt/gold chrome buckle. My skinny belt is black with a black chrome buckle for work. These make great gifts or stocking stuffers and come in little plastic boxes for easy wrapping and storage.

i should have been a housewife
Riding Sport Uptown breech in charcoal

My new favorite schooling breech is the Riding Sport Uptown Breech from Dover Saddlery. They look and fit great, people always compliment me on them and are shocked that they are under $100. They hold up very well, are super comfortable, and are very flattering. They feature a modern euro seat and soft flexi-cuff leg openings so no more discomfort from hook and loop closures. They come in charcoal and black with silver brushed details.


4. Ogilvy Jump Baby Pad- Starting at $37
i should have been a housewife
Demo of the Jump Baby Pad with charcoal binding and turquoise piping
i should have been a housewife

I just purchased my Ogilvy baby pad after loving my half pad for an entire year. This baby pad is wayyy more substantial than a normal baby pad. It actually seems to be the thickness of a normal rectangle pad to me. I wanted my baby pad to coordinate with my half pad so I ordered a white body with charcoal piping then upgraded to turquoise piping ($7 for single piping), a diamond monogram on the left side in turquoise ($12), and the Ogilvy logo in turquoise and grey on the right side ($10). I really love how it came out and will probably end up using it as my show pad it's so nice. If you want the Ogilvy logo embroidered on your pad you have to email in your order and they contact you back for the details. The Ogilvy sales team made it so easy and was a breeze to order the pad this way and it came out exactly how I wanted it and arrived quickly. The pad is also anti-microbial, anti-fungal, has an ergonomic shape, and it dries quickly. What's better than that?!


5. Ariat Heritage Contour Zip Field Boot ($290)
i should have been a housewife
Ariat Hertiage Field Boot, available in back or brown

I just got a pair of these a few weeks ago for schooling and I'm in love with them. The elastic panel ensures a snug fit without causing me to loose all feeling in my foot. Gone are the days of "if you can't feel your feet than they fit right" and having leg cramps since the blood flow is interrupted by yet-to-be broken in tall boots. The elastic panel that runs the length of the boot allows for a slimmer, more flattering ankle and the leather quality is better than the last model of the boot. There is also a dress boot version coming out this spring that I can't wait to see.

That's all for now, hope Santa brings everything you wish for!

Be sure to follow me on instagram @rocky092


Tuesday, December 1, 2015

Weekend Visit to Legacy Farm

I should have been a housewife

I finally had some time to drive down to Philly one weekend to take a lesson and visit at Legacy Farm where I was taking horseback riding lessons in optometry school. They have amazing instruction there and high quality lesson horses. 

After my lesson I was able to hang around and take some pictures of Emily & Zander and Brianna & Bentley. Both pairs are very photogenic and it was hard to even take any bad pictures of them.

I should have been a housewife


I should have been a housewife

Emily always practices adjustability and responsiveness, Zander loves to gallop and we were all shocked at just how quickly he can move!

I should have been a housewife

And here is his airborne!

I should have been a housewife

Bentley is just gleaming in this picture, this shot is one of my favorites from today.

I should have been a housewife

Thanks to Emily and Brianna for some great action shots of their lovely boys!


Monday, October 5, 2015

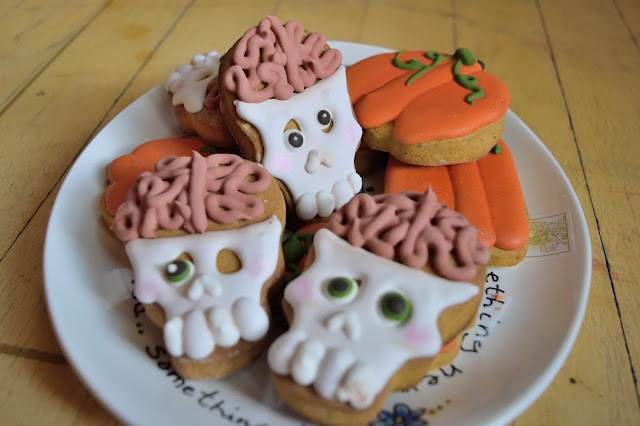
Zombie Skull Cookies for Halloween

I Should Have Been a Housewife

This crazy summer has finally passed so I've been trying to catch up on all of the things I've lost track of. Here's a quick post of some Halloween cookies I made last week so I can get back into the swing of things.

The original cookies and tutorial that inspired me to make these cookies can be found here.

Enjoy!


I Should Have Been a Housewife


I Should Have Been a Housewife

Thursday, October 1, 2015

Bloomsburg Fair 2015


The fair was great as usual and I was able to get all of my favorite foods and try a couple of new ones!

The steak and cheese sandwich with its buttery bread and gooey cheese is always a hit and did not disappoint this year either.

I should have been a housewife

You can't go to a fair without a funnel cake...

I should have been a housewife

...or monkey bread for that matter.

I should have been a housewife

One of my favorite snacks are the cactus fries, just add vinegar and ketchup, yum.

I should have been a housewife

I should have been a housewife

This year my new favorite was a homemade apple dumpling with cinnamon ice cream, sooo good and the warm dumpling was perfect on our chilly visit.

I should have been a housewife

Until next year!


Monday, July 13, 2015

My DIY Bridal Shower

I should have been a housewife

 After many weeks of planning, we finally celebrated my bridal shower this past Saturday*. Friends and family gathered round to celebrate my upcoming nuptials at Paisano's, my favorite restaurant in Rutherford. My maid of honor and I are pretty crafty so we wanted to DIY as many of the decorations as possible, I really love how everything turned out. 

I can't believe that I forgot to take pictures of some the shower decorations, especially after all the work we put into them. The signs, banners, and centerpieces are some things I forgot to take pictures of so I thought I'd set them up at home to give a little example of what I was trying to go for.

I should have been a housewife

I should have been a housewife

Another decoration I fell in love with was a picture of a Kitchenaid mixer used to hold a bouquet of flowers featured on Hostess with the Mostess. I thought a floral monogram I found by Sweetly Chic Events would also be a nice addition to the gift table.

I should have been a housewife

I should have been a housewife

Since the shower started at noon I wanted to have a mimosa bar and some punch to keep things on the lighter side. I saw this 'bubbly' sign used for a New Years Eve party and decided to recreate it. I have a feeling it's going to make some more appearances since it's my hands down favorite thing I made for the shower.

I should have been a housewife

I should have been a housewife
Here's a full shot showing the crates and moss covered foam that supports the letters
I picked up the mini easel signs from Michael's and wrote on them with a chalkboard pen to let guests know what was in each drink dispenser.


I should have been a housewife


I should have been a housewife

I wanted to keep the centerpieces simple but still have an impact so I picked out some orchids and african violets to decorate the table (I forgot to take pictures of them day of but here they are when we picked them out the week before the shower).

I should have been a housewife

My bridesmaids all chipped in and got us our vacuum off the registry, they did an awesome job decorating the box since it was a no wrap shower. I bet you didn't know Nick and I were models.

I should have been a housewife

I should have been a housewife

For dessert we set up a cookie bar filled with all different types of homemade treats. We also ordered delicious cupcakes from House of Cupcakes which we stacked on crates that we bought and stained from Michaels. We finished off the table with gold and confetti balloons from a local vendor and matching gold frames with descriptions of the desserts. We also provided to-go containers so that everyone was able to bring home cookies or cupcakes as a treat for later.

I should have been a housewife

I should have been a housewife

My favorite of the cupcakes were the s'mores with a graham cracker bottom, chocolate cake, and fluffy icing dipped in ganache. Hard to fit all in one bite but I tried!

I should have been a housewife


Where to Buy:
  • Card board letters for floral monogram- Hobby Lobby
  • Signs, banners, and wreath components- Michael's
  • Crates and letters for mimosa sign- Michaels
  • Orchids and flower pots- IKEA
  • Drink dispensers- Bed, Bath, and Beyond
  • Cupcakes (fluffy chocolate, vanilla rage, s'mores, and strawberry shortcake)- House of Cupcakes
  • Food and location- Paisano's, Rutherford, NJ
Let me know if you want more info on any of the crafts we did or where to find them.

Check out the rest of my shower ideas on my Pinterest page here and be sure to follow me on instagram @rocky092 for more engagement, shower, and weddings posts

*A huge thank you to my maid of honor Jessica for help with all of the decorations, to my two mothers for hosting and baking for the shower, to my fiance and two fathers for coming early to set up and coming  back after to help clean up, and to my friends and family members who came out to give their love and support on such a wonderful day. Thank you all.

Tuesday, June 2, 2015

Salted Caramel Chocolate Torte

I should have been a housewife

I saw this salted caramel chocolate torte floating around Facebook a couple of weeks ago and it looked right up my alley. I looooovvveee caramel and you can't go wrong by adding the chocolate ganache with a  sprinkle of sea salt.

The full original post with recipe and pictures can be found on the Home Cooking Adventure blog. Below are the instructions and ingredients from Tastemade's Youtube video


The recipe took me almost all day to make but was well worth it. To save time I would make and chill the crust the night before and roll it out in the morning.

Salted Caramel Chocolate Torte
Makes about 6-8 servings

Almond Chocolate Sweet Pastry
1 1/4 cups (160g) flour
1/4 cup (30g) ground almonds
1/4 cup (30g) unsweetened cocoa powder
1/4 cup (50g) sugar
1/4 tsp salt
1 stick (110 g) cold unsalted butter, cut into small (1/2-inch) cubes
1 tsp vanilla extract
1 egg
1-2 tbsp ice water

Caramel
1 1/2 cups (300 g) sugar
1/2 cup (100g) water
1/2 cup (120 g) heavy cream
5 tbsp (70 g) unsalted butter
1 tsp salt

Chocolate Ganache
1/2 cup (120 g) heavy cream
4 oz (120g) bittersweet chocolate, chopped

Garnish
sea salt crystals


Directions
1. Prepare the sweet pastry. In a large bowl mix flour with ground almonds, cocoa powder, sugar and salt.

2. Incorporate butter to the flour mixture, using a pastry blender, a fork or a pastry processor, until crumbs are formed. Add the egg and vanilla extract and mix them in. Add water and incorporate into the dough. Wrap it with plastic, knead slowly to form a disc and refrigerate for at least 30 minutes or overnight.

3. On a floured surface or over the plastic wrap roll the dough to a circle with about 1 1/2 inches larger than your tart pan. Lift up the rolled dough and place it on a greased 9 inch tart pan. Remove the edges and refrigerate for 30 minutes before baking.

4. Prick the dough with a fork, line a parchment paper over the dough. Fill with dry beans, rice or pie weights.

5. Bake for 15 minutes in preheated 350 F (180C) oven. Remove the weights and the parchment paper. Return to oven for another 10 to 15 minutes. Allow to cool before removing from the tart pan.

6. Prepare the caramel. Place the sugar and water in a medium heavy bottomed saucepan over medium-high heat, and cook without stirring until sugar dissolves and gets a caramel color.

*This step took me approximately 10-15 minutes and I actually had to do it twice. The first time I was afraid of burning the caramel so I took the mixture off way too early and it was nowhere near caramel when I tried to mix in the cream and butter. The second time I thought I burned and ruined the sugar mixture when I waited for it to turn a caramel color since it was smoking slightly and smelled a hair burnt, but it came out prefect after mixing the cream and butter.

7. Remove the pan from the heat and add the cream. It will bubble a little bit.

8. Cook for about 1 or 2 minutes stirring constantly with a wooden spoon until smooth. Remove from heat and add butter and salt. Stir well until smooth.

9. Let the caramel cool slightly and pour over the chocolate crust. Refrigerate for about 4-5 hours.

10. Prepare the chocolate ganache. Heat the cream in a small saucepan. When the cream just begins to boil at the edges, remove from heat and pour over the chopped chocolate. Let sit one minute, then stir until smooth.

11. Pour the chocolate ganache over the caramel. Spread it evenly and refrigerate for another 2-3 hours before serving. Sprinkle with sea salt flakes and serve.

Enjoy!

Monday, May 18, 2015

Mother's Day Sugar Cookies and a Recipe for Tropical Trifle

I should have been a housewife

i should have been a housewife

For Mother's Day a couple of years ago I made some really cool monarch butterflies from Hello Cupcake. They were my favorite cupcakes to make by far and I wanted to try and recreate them into a sugar cookie for Mother's Day this year.

I should have been a housewife

I should have been a housewife

I hosted a Mother's Day BBQ for my mother and mother-in-law and decided to make my cousin Jeff's trifle to accompany the cookies for dessert. Every year his trifle is requested at all of the family holidays and it's a perfect springtime dessert with hints of coconut, crushed pineapple, and mandarin oranges. The best part is you can cook the components the night before and assemble it the day-of to make the day even less stressful.

I should have been a housewife

 Jeff's Tropical Trifle
2 cans crushed pineapple, juice reserved
2 cans mandarin oranges
1 box yellow cake mix
1 box vanilla cook and serve pudding, not instant pudding
1 box coconut cook and serve pudding, not instant pudding (can used 2nd box of vanilla if coconut isn't available)
3 cans Goya coconut milk
2 cup shredded coconut, divided
1 cup malibu rum
1 pint heavy cream

Night before/morning of

1. Substituting coconut milk for regular milk, make pudding according to package directions (mix powders from both packets into one pot). While the pudding is cooking make sure to stir the pudding constantly so the bottom of the pot doesn't get scorched. Once pudding has thickened add 1 cup of shredded coconut to pudding and place on counter to cool. To prevent a skin from forming, place plastic wrap directly on the pudding. 

(If making the night before, once the bowl is cool to the touch, place in refrigerator until you're ready to assemble the trifle)

2. Drain the two cans of crushed pineapple, saving the juice, and place solids into a non reactive bowl. Prepare the cake mix replacing the water with an equal amount of pineapple juice and bake on a jelly roll sheet following the box instructions.

3. Drain the mandarin oranges and add the fruit to the bowl of crush pineapple. Add 1 cup Malibu rum and allow to soak into the fruit as long as possible (night before would be best). If there's any left over pineapple juice after the cake is baked, you can add it back into the fruit mixture. Refrigerate mixture if making the night before. 

Day of

4. Assemble trifle by cutting a circle of cake using the trifle bowl as a guide. Build by placing a layer of cake into trifle bowl, topping that with a layer of mixed fruit (approximately half) and drizzling some of the leftover juices onto the cake. Top the fruit with a layer of pudding and repeat until you reach the top of the trifle bowl.

(I actually had enough left over to make one more mini trifle in a canning jar for lunch the next day... Yum!)

5. Top trifle with fresh whipped cream and remaining coconut.

Enjoy!


Monday, May 4, 2015

Happy Star Wars Day: May the Forth Be With You

I should have been a housewife

Happy Star Wars day everyone! Ever since I found out this was a real thing I've been wanting to make cookies for it. The Sweet Adventures of Sugarbelle has a bunch of really awesome cookie pictures and tutorials for Star Wars cookies including what cookie cutters you can useR2-D2 and Yoda tutorials, and a post of the whole set. If you haven't been to her site before, you need to take a look at her work, it's simply amazing. Anyway, here are some pictures of the Star Wars cookie set I did for Star Wars day.

Enjoy!

I should have been a housewife

I should have been a housewife

I should have been a housewife


Another Busy Weekend at the Farm and Some Waterfall Pictures

I should have been a housewife

The weather was beautiful last weekend and when I wasn't helping my parents getting the farm ready for the warmer weather, I was walking around taking pictures and experimenting with my camera. 

I always used to wonder how photographers were able to take pictures of waterfalls and get a misty, soft shot of the moving water, making it appear almost magical. I've read up on it a few times and learned its due to the shutter speed. When the shutter speed is slower, moving objects become blurred when the picture is taken while motionless objects remain the same. Since we have a small waterfall on the farm I thought it was the perfect oppertunity for me to practice with moving water.


Since the water was flowing and the rocks were motionless with a steady hand I was able to play around with the shutter speed and get my shot! It took a bunch of different adjustments to ISO, shutter speed, and going back and forth between my lenses, but I finally got some I was happy with. I ended up having to wait for the sun to go behind some clouds and that gave me some pictures that weren't so over exposed.

I should have been a housewife
Waterfall with a "normal" shutter speed

I should have been a housewife
Waterfall with a slower shutter speed but still not there
I should have been a housewife
Waterfall with an even slower shutter speed, magical!
In hindsight I would have gone back and switched from JPEG to RAW to try and save some of the white tones,  I didn't realize I had switched it until we were getting ready to go home for the weekend.

I also had a lot of followers throughout the day, the chickens were especially interested in what all the clicking was about.

I should have been a housewife

I should have been a housewife

I should have been a housewife

Julie and Lilly both followed me all around the farm, keeping watch over the chickens and running along the paths.

I should have been a housewife

I should have been a housewife

I should have been a housewife

I should have been a housewife

After all the running, picture taking, and prep work, we took a break on the new deck, enjoyed a bit of the warm weather, and took in all the changes that come along with spring. Lilly is such a ham and enjoyed sitting on the deck with her Mr. Grandpa.

I should have been a housewife

Be sure to follow me on instagram @rocky092 for more pictures and posts

I should have been a housewife