Friday, October 31, 2014

Halloween Cookie Set


ghost and spider sugar cookies

I decide to make some pumpkin spice sugar cookies and decorate them for Halloween this year. I picked up two awesome copper cookie cutters at the end of last season from William Sonoma for $1.99 a piece (a steal, I know). One is a skull and crossbones, the other is a large ghost.

To make the project a little more interesting I added a spider and it's web, tombstones, and two types of pumpkins with cutters I purchased from The Cookie Cutter Company. The Cookie Cutter Company has a great assortment of cookie cutters, most in the $1-$2 range and I beefed up my Wilton 100 piece set with tons of extras, without breaking the bank.

 The whole Halloween set


Spiders and their webs


Spooky ghosts


A step by step guide for the skull and crossbone cookies can be found here.

Enjoy.

Be sure to follow me on instagram @rocky092 for more cookie and baking posts


Happy Halloween!!

Happy Halloween everyone!


This year I decided to be a deer for Halloween since I had everything I already needed (super fun, I know). This costume has to take me from work to the Penn State tailgate later tonight, so it needed to be work appropriate but fun. I had seen some pretty cute make up ideas using eyeliners and bronzer, so I thought I'd give it a shot.


All it required was bronzer across the forehead, cheek bones, and sides of nose. Then I took a jumbo white eyeliner pencil to the forehead and center of nose, blending into the bronzer. I drew a cresent on the tip of my nose in black eyeliner for a snout and used the jumbo white liner to make some fawn spots on my cheekbones and temples. Some normal black eyeliner, mascara, and flash lashes completed the doe-eyed look.


A whole group of us were supposed to dress up, but the others "forgot"

Hope you all have a fun and safe Halloweeen!

Be sure to follow me on instagram @rocky092 for more makeup and fun posts


Wednesday, October 29, 2014

Yay Panera!

I eat Panera probably more than what's a healthy amount, but there's one practically right next to where I work and it's super convenient. On days when I'm too lazy or running late to make a lunch, I order online and pick it up when I'm ready.

So I finally decided to sign up for their rewards card. Just for signing up you get a free pastry, and this month it was a free you pick row after purchasing 5. Today I redeemed both of those, which means I got my $10.48 lunch for free.

For my pastry I ordered their cinnamon crunch scone since I loved the bagel when I tried it earlier in the week. 


It tasted just like a coffee crumb cake but was a little less messy to eat. It's definitely for those with a sweet tooth and some extra calories to spare (about 500 calories for the whole scone). I could eat half and I'm saving the rest for later. With a cup of coffee it was perfect on this cold, damp fall day. 

Saturday, October 25, 2014

Homemade Pumpkin Spice Pancakes


I had some more pumpkin purée to use before it went bad so I decided to make some pumpkin spice pancakes for breakfast this morning. Served with butter and hickory syrup, they were fluffy and delicious, the perfect fall morning treat. 

Pumpkin Spice Pancakes
1 1/2 cups milk
1 cup pumpkin purée
1 egg
2 tablespoons canola oil
2 tablespoons white vinegar
3 tablespoons brown sugar
2 cups all purpose flour
2 teaspoons baking powder
1 teaspoon baking soda
1 1/2 teaspoons cinnamon
1/2 teaspoon nutmeg
1/2 teaspoon ground ginger
1/2 teaspoon salt

1. Preheat two large fry pans on medium heat. Measure all wet ingredients in a mixing cup and mix well. 

2.  Measure all dry ingredients into a medium mixing bowl and combine. Pour wet ingredients into dry ingredients and mix until just combined. 

3. Add one tablespoon of butter to each fry pan and melt. Using a measuring cup, ladle approximately 1/4 cup pancake mix onto pan. Cook 4-5 pancakes per pan, waiting to flip until a few bubbles rise to the top of the pancake (these pankcakes fill not form as many bubbles as normal pancakes would, be careful not to burn them).


These pancakes are just about ready to flip


Keep cooked pancakes warm either on a tray in the oven set to warm, or on a plate in the closed microwave. 

6. Serve warm with butter and syrup or any other fall toppings you may like. 

Enjoy!!

Be sure to follow me on instagram @rocky092 for more baking, brunch, and food posts


P.S. These also freeze great. Just seperate pancakes by a small piece of wax paper and stick into a sealable plastics bag. When ready to eat just remove however many pancakes you'd like and reheat. 


Friday, October 24, 2014

Coconut Macaroons


I'm a huge, huge fan of French macaroons (or just macarons). Some would even say I'm obsessed, and they wouldn't be wrong. But before there were french macarons, I used to make coconut macaroons. 

French macarons are made using a nut flour (most commonly almond) mixed with powdered sugar, which is then combined with meringue. Coconut macaroons are made with shredded coconut and egg whites. 

Coconut macaroons

French macaroons or macarons

Not having made coconut macaroons in years I decided to bake a batch for my best friends birthday. Jessica and her family get chocolate drizzled macaroons from a local bakery that are to die for and I tried to replicate that recipe. 

Chocolate Drizzled Coconut Macaroon

1 package shredded coconut (14 oz)
1/2 cup cream of coconut
6 tablespoons flour
4 egg whites
1 teaspoon vanilla extract
2/3 cup semi sweet chocolate chips

1. Preheat oven to 325 F.  Combine coconut, cream of coconut, and flour in a large bowl. Mix well. Add egg whites and vanilla extract and mix until well combined. 

2. Drop heaping teaspoonfuls of coconut mixture onto baking sheets fitted with silicone mats or parchment paper. Bake for 25 minutes until tops are golden brown and look like they have dried up slightly. 

3. Allow macaroons to cool completely on their baking sheets. Place chocolate chips in a sealable plastic baggie and microwave for 15 seconds at a time, massaging in between intervals to mix chocolate. Once chocolate is smooth and uniformly heated, seal bag and snip off a small corner with some kitchen scissors. Drizzle chocolate quickly across tops of macaroons using a smooth back and forth motion and even pressure. 


6. Allow chocolate to cool and set, then macaroons are ready to eat. 


Hope you enjoyed!

Be sure to follow me on instagram @rocky092 for more food and baking posts


Thursday, October 23, 2014

Farm Grown Brandied Pears


Earlier this week I posted a recipe for apple cobbler. I also mentioned that when we picked the apples, we also picked some asian pears.


My mom cans brandied pears almost every year and they taste great served with vanilla ice cream, whipped cream, or even on their own. We thought why not try it with the pears from our cousins house? Here's the recipe we use each year.

Brandied Pears
4 cups sugar
5 cups water
3 cups brandy
10 lbs pears

1. Prepare the jars for canning by washing them with soap and water. Bring a large and a small pot of water to a boil. Place the jars in the large pot and the lids and rings into the smaller pot. Boil each for 15 minutes to sanitize. Once the timer goes off for the jars, remove them from the pot and allow to cool on a clean towel. Lids and rings can be removed from the heat and left in the pot. While the jars are boiling, start the syrup mixture.

2. In a medium pot, combine sugar and water and bring to a boil over medium heat. Boil for 15 minutes until syrup has thickened slightly. After 15 minutes, remove from heat and add brandy.

3. Peel and slice pears into bite size portions. After the sanitized jars are cool enough to the touch, add pears high enough to reach the neck of the jar.


4. Add brandied syrup to the neck of each pear filled jar


5. Wipe mouths of jars and fit with lids and rings. Place into a large pot of boiling water and cook for 15 minutes. Remove from the pot and allow to cool. After cooling, check to make sure the seal has properly formed by pushing on the tops of the jars. There should be no give/click when you push on the top of the lid.


Yields 4 quarts


Wednesday, October 22, 2014

Date Night Dinner: Mussels in White Wine


I love seafood and I try to make it whenever I can at home. This week I was craving mussels so I stopped at Wegmans and picked up some organic rope grown mussels. At $6 for 2 lbs, you can't beat a $3 mussel dinner (2 lbs of mussels is way too much for me to eat in one sitting). I used Ina Garten's mussels in white wine recipe since her recipes are usually really fresh and flavorful. I changed the ingredients slightly to use up some of what I had on hand. The original recipe is listed above and what I used is listed below.

Mussels in White Wine

2 pounds mussels
1/3 cup flour
2 tablespoons unsalted butter
2 tablespoons good olive oil
1 cup chopped onion
1 1/2 tablespoons minced garlic (5 to 6 cloves)
3/4 cup chopped tomato
1/3 cup chopped flat leaf parsley
1 tablespoon fresh thyme leaves
1 cup good white wine
2 teaspoons kosher salt
1 teaspoon freshly ground black pepper
Toasted baguette (optional)

1. Soak mussels in a large bowl with the flour for a half hour, remove the beards and discard any mussels that are not tightly shut.


I did this, and all of the mussels were shut and no beards were present, so I'm pretty sure the mussels had already been cleaned. This step should make the mussels empty some of the sand they may have, so I'd probably do it again in the future anyway.


2. In a large fry pan, heat the butter and olive oil over medium heat. Add the onions and cook for 5 minutes. Add the garlic and cook for 2 more minutes, or until the onion are translucent. Add the tomatoes, parsley, thyme, wine, salt, and pepper and bring to a boil over medium-high heat.


3. Add the mussels, stir well, then cover the pot. Cook over medium heat for 8 minutes, shaking the lidded pan once or twice to prevent scorching, until all the mussels have opened (may take an additional minute or two). Discard any that do not open.

Mussels after cooking and ready to be served


4. Pour into a large shallow bowl with toasted baguette and enjoy!


The best part of the meal in my opinion. Baguette soaked in the white wine sauce then topped with sauteed herbs and tomatoes, super flavorful

Enjoy!

Tuesday, October 21, 2014

Mary Beth's Apple Cobbler


This weekend we went to a local apple festival near the farm. In addition to selling apples they have various baked goods, home cooked Polish food (pierogi and haluski), candy, and my personal favorite, chocolate covered caramel apples. We also picked up two bottles of Razz's hickory syrup which tastes amazing on anything from grilled peaches to sausage and squash. Hickory syrup is similar to maple syrup but with a smokier, woodsier taste. I've never seen hickory syrup anywhere other than from this vendor, at this festival, and we finished ours up so quickly last year I knew I had to grab more. The website also has a ton of recipes you can find here.

After spending the day eating all the different treats the festival had to offer, we picked out a bag of Honeycrisp apples, which are my favorite (not including ones covered in chocolate and caramel), and headed home to bake some more treats.

Since Honeycrisp apples are too good to eat any other way than fresh, we used apples that we picked from my cousins orchard the day before. They have a few trees filled with apples and pears that are great for baking as well as eating fresh. Since everyone I know loves apple cobbler, that's what we decided to bake. A recipe using the pears will be posted later this week.

I was lucky and had my cousins as baking assistants,
they peeled almost all the pears and apples for me!


Mary Beth's Apple Cobbler
This recipe is from my future mother in law, I just add a little bit of nutmeg since I love it and some oatmeal for extra texture.

7 large apples
1 1/4 cups flour
1/4 cup instant oatmeal
1/2 cup sugar
3/4 cup packed brown sugar
1 teaspoon cinnamon
1/4 teaspoon ground nutmeg
1 1/2 sticks of cold butter, cubed

1. Preheat oven to 400 F. Peel and slice apples into bite size chunks and place into a buttered rectangular baking pan. (I doubled the recipe when I made it, so I used two baking pans)

2. In a separate bowl mix together the dry ingredients until well combined. With a pastry blender (or a large fork if you don't have one handy) combine the cubed butter with the dry ingredients until only small pieces of butter remain. Spread mixture thickly on top of the apples.


3. Bake cobbler for 45 minutes or until apples are soft and cobbler topping is golden brown and crunchy.


I served mine with homemade ice cream, either pumpkin spice, vanilla bean, or both. The cobbler is amazing right out of the oven, the heat from the cobbler starts thawing the ice cream and makes things all melty and wonderful.


Hope you enjoyed, let me know if you have any questions!


Saturday, October 18, 2014

Soft Kitty, Warm Kitty, Little Ball of Furrr...

If you watch the Big Bang Theory, chances are you know how catchy the soft kitty song is. Every time Penny sings it to Sheldon I find myself singing or humming it for the rest of the night. 


Anyway, today that song was stuck in my head ALL DAY because we found a kitten!


My sister, mother, and I were coming home from lunch when I saw a little black fur ball sitting in the middle of the road. Since our farm isn't in a residential area, the speed limit on the road is pretty high, 40 at least. As I slowed down, it ran off into the brush that lined the sides of the road. We could see that it was still sitting there, so I pulled onto the shoulder and my mom got out to see if she could catch it. After 15 minutes of crawling through brush, over logs, and into ditches, we were soaked and no closer to catching the kitten. 

We decided to head back to the house and return with a Havahart trap. 30 minutes, 4 people, and a high speed golf cart ride later, we were bringing the kitten back to the farm. 
We unloaded the kitten into a large dog crate and were surprised to find that he would let us hold him in a towel. My dad immediately bonded with him as did everyone else in the family. Knowing he was a keeper, we decided to name him Lucky. 


He's a little cutie and I hope living with us will make him fat and happy. 
Until next time!


Friday, October 17, 2014

Equestrian Wishlist and Some Cute Horse Pictures

Weddings are expensive. There are a few equestrian things I've had my eye on for a while, but in reality won't be able to purchase until after my wedding/when I have a real job.

Tailored Sportsman has a ton of great colored breeches for schooling and I'm loving the fern green in the Trophy Hunter Front Zip. The fern green in person is actually a really nice shade of not-too-green green and less khaki than the picture shows. They can be found at SmartPak and other retailers starting at $179.95.


Another item that's slowly grown into one of my new obsessions is brown leather tall boots.


These are Ariat® Challenge Contour Square Toe Field Boot in cognac and can be found at SmartPak for $399.95. They have a full length elasticized panel on lateral side with elastic gusset on inside knee as well as a contoured ankle. With a fashionable sqaure toe, these are boots I'd love to have for schooling, especially now that fall is upon us.

I bought a Samshield Shadowmatt helmet two years ago on national helmet awareness day and I love it. Samshield also makes custom helmets with a ton of different options. Sticking with the brown theme, I customized a helmet, complete with name personalization on the chin strap. Totaling $2668 it is WAY out of my comfort zone to spend on a helmet, but with crocodile accents, a girl can dream.


Click here to customize your own on the mySamshield page

Going on with the custom theme, Equifit makes custom D-Teq open front and ankle boots. With fun leather patterns and a choice of colors, these boots sell for only a slightly higher price point than the Equitfit LUX boots that I already have. Do I really need a pair of new boots for a horse that I don't have? Nope, but I spent close to fifteen minutes designing a new pair.

The last item im going to talk about is one that I'm REALLY excited about purchasing once I find a horse. It's a custom monogrammed bridle. The first time I saw one was before I was even in high school, but the thought of owning one has stuck with me since. Bennett's Hunter (TM) offers monograms on their bridles at only $15 per letter, but that does not include the price of the bridle and reins. A little bit of a splurge, but properly cared for leather can last a lifetime.

Thanks for reading!

Be sure to follow me on instagram @rocky092 for more equestrian and horseback riding posts


Ocho


Galant


Ronnie


Tiger


Nick


Luther


Friday, October 10, 2014

Past Sugar Cookie Projects

Before heading to Atlantic City for a conference this weekend, I thought I'd do a quick post on previous sugar cookies I have made. My sugar cookie obsession started after stumbling upon the Sweet Adventures of Sugarbelle, the cookies are out of this world amazing. The blog features step by step instructions with photos, recipes, tips, and a whole bunch of extras.

My first attempt at making intense sugar cookies was for Thanksgiving last year. I just followed the step by step instructions for Sugarbelle's decorated turkey and pumpkin cookies and here's how they turned out. 


Pretty good for my first time, eh?! They took me about a day and a half to make, but that included the baking of the cookies and drying time in between icing colors.

The next set I made was for Christmas of last year and I followed this reindeer tutorial, which was actually a guest post, leaving out a few of the more ornate finishing details. I also added a few cookies of my own design including customized Santa hats and snow topped candy canes.  


Santa hat cookies

                                                                                                     
The last set of cookies I'm going to sugar with you are ones that I made at the end of my low vision rotation in optometry school. They were mini retina cookies with various ocular diseases. 

retinal disease cookies


These were ones I designed completely by myself and I was really happy with how they came out.

That's all for now, hope you enjoyed!

Be sure to follow me on instagram @rocky092 to se more food and cookie posts


Wednesday, October 8, 2014

Pumpkin Spice Challah Bread


I wasn't joking when I said that I was obsessed with pumpkin spice everything in the fall. In the last week and a half I've used 3 cans of pumpkin purée. And it's only October.

On the drive home I had a craving for challah bread. Knowing I had some leftover pumpkin purée, I wondered if I could make pumpkin spice challah bread. I got home and immediately looked up a recipe, and set out to experiment with my first batch ever. 

Pumpkin Spice Challah Bread
1 1/2 teaspoons active dry yeast
1 1/4 cups warm water (110 F if you have a thermometer handy)
1/4 cup honey
2 tablespoons canola oil
2 eggs, one for dough, one for egg wash
1 1/2 teaspoon salt
1/3 cup pumpkin purée
1 tablespoon cinnamon 
2 teaspoons ground nutmeg
1 teaspoons ground ginger
6 cups all purpose white flour 

Yields 2 loaves of challah bread

1. Place warm water in bowl of stand mixer. Sprinkle active dry yeast over top and set to the side.  In a small measuring cup, measure out honey and add pumpkin, oil, one egg, salt, and spices. Combine well. 

2. Add contents of mixing cup to water/yeast mixture and attach to a stand mixer fitted with a dough hook. Turn speed to stir and slowly begin adding the flour. Add a single cup at a time waiting until most of the flour has been incorporated before adding the next cup. 

3. Once all the flour has been added, mix for an additional 8 minutes or until the dough clumps around the hook. The dough should no longer be sticky to the touch and should spring back after it's touching it. (If the dough is too sticky, gradually add small amount of flour until the right consistency is reached, 1/4 cup at a time). 


4. Remove dough from mixer bowl, shape into a ball, and place in a glass bowl to rise. Cover bowl with a damp cloth and find a warm spot in your kitchen to let the dough rise for 1.5 hours or until doubled in size. 


Here the dough has almost risen enough, only a little bit more to go
5. After the dough has doubled in size, divide in half and knead for 5 minutes on a floured surface. Divide the dough half into thirds and using a rolling/stretching motion, roll out into logs approximately 1.5 inches in diameter. Firmly pinch ends of logs together. Braid the three strands of dough, firmly pinching the end of the braid to secure. Repeat for the second half of dough.


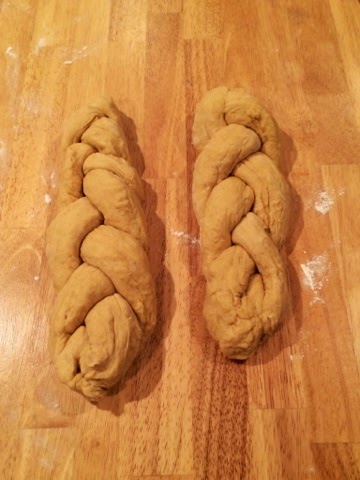
6. Place each half on a greased baking tray and cover with the damp cloth. Allow the braided dough to rest for another hour.

While the dough was resting I munched on, you guessed it, pumpkin seed brittle! I bought it at Trader Joes and it's a nice blend of pumpkin pie spices and pumpkin seeds.


 7. During the last 10 minutes of the dough resting, preheat oven to 375 F. Beat 1 egg with one tablespoon of water to make egg wash. Liberally brush each loaf with wash. Bake loaves for 40 minutes until golden brown and bottoms sound hollow when tapped. Cool on a wire rack for 1 hour before slicing. 


Super tasty with spread with a little of Trader Joe's pumpkin butter. Awesome and well worth the wait!

Hope you enjoyed!

Be sure to follow me on instagram @rocky092 for more recipes and food posts